Last year the members of my Patchwork Group made 12 flowers and put our names and year on the flower. We then swapped the flowers and ended up with a flower from each member. The challenge for last year was to make something with the flowers. I made this wall hanging for my sewing room. I didn't get my challenge done on time due to chemo and radium, but it is finished now and I love it.
Showing posts with label Patchwork. Show all posts
Showing posts with label Patchwork. Show all posts
Saturday, 29 February 2020
Wall Hanging.....
Last year the members of my Patchwork Group made 12 flowers and put our names and year on the flower. We then swapped the flowers and ended up with a flower from each member. The challenge for last year was to make something with the flowers. I made this wall hanging for my sewing room. I didn't get my challenge done on time due to chemo and radium, but it is finished now and I love it.
Sunday, 10 February 2019
Flowers ....
Over the Christmas Patchwork Break someone suggested that we make these flowers and swap them on our first day back at patchwork so that everyone ended up with one flower from each person. We also had to put our name and year on it too. I managed to get mine all done but as I am not into hand work the lady that runs the Patchwork Group also has an Embroidery Machine so she had the digitized which made it a bit easier for me. So now we have to make all the flowers into something for judging in a few months time. Will have to get my thinking cap on for that.
Friday, 16 June 2017
U.F.O.
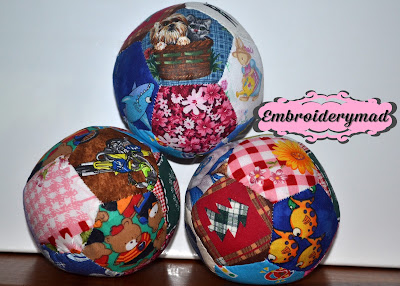
I have had the pieces for these balls cut out for a very long time, I am going through and trying to catch up on all my U.F.O.S. I think they turned out really well and as they are made all by hand ( I am not really into hand work), but it is something that I can do while watching TV at night.
Monday, 29 May 2017
Patchwork Project.......
Every couple of months we do a project at the Banana Patchwork Club that I attend. This doily was what we made last week. It looks really complicated but if you follow the directions it is quite easy. Everyone was amazed at how unique the doilies looked, made from all the different fabrics. I think this one will be for Christmas....
Saturday, 19 November 2016
Snack for Santa Wall Hanging.......
I made this little wall hanging for my grandsons to put up when Santa is visiting on Christmas Eve.. I hope Santa enjoyed his snack. It wasn't a big project and I embroidered the message " Enjoy your Snack, Santa" onto black fabric and the stitched it onto the background fabric and covered a small canvas using staples to hold it altogether at the back, added some decoration and boys loved it. I hope Santa does too.
Sunday, 16 October 2016
Finally Finished
Finally got around to finishing the cover for my Singer Embroidery Machine. It took me quite a while to make all the selvage blocks. I found a very long selvage that looks like small fringing and stitched that around the bottom of the cover. I also made an In the Hoop flower from Embroidery Garden just to give it a bit more character. Now my machine can take pride of place in my sewing room.
Sunday, 3 July 2016
Challenge Time Again !!!!!!
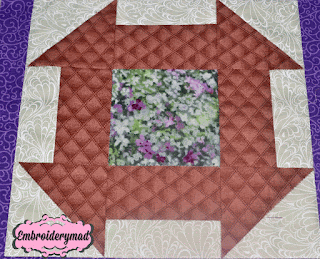
Every year we do a challenge set by Carol the lady who runs our Patchwork group. This year she gave us a Patchwork Square that she had made and we had to make something with it. The square is in picture one and I put the purple around it. I decided to make this cute little bag. I always try to do something different as I can't see the point in making the same thing over and over again. I found the pattern here ( crazy mom quilts) and the directions were very easy to follow. It is really a surprise when you unzip the bag to find three little zippered compartments inside. By the way I got 2nd place and won a $25.00 voucher to spend on fabric. Lucky me.
Sunday, 12 June 2016
Joining Selvedge.......
Sunday, 1 May 2016
Selvedges !!!!!!!!!
At our last Patchwork day we all had to bring some Selvedges and some 4 and 1/4 inch blocks. This was one of the designs that we could work with. The way the blocks are put together is what determines the design. I haven't yet decided what I will be doing with my blocks, but I will have to make a few more so I have enough to play with. So, don't throw away your selvedges, there are plenty of great ideas out there.
Saturday, 9 April 2016
Pot Holder.........
We all made these pot holders at our patchwork group. A great way to use up some scraps. The pattern says that you sew the front and back together with the right sides facing leaving a gap for turning. I decided to do mine a bit different and quilt all the layers together and bind the edges. It took a bit more time but I really liked the finish.
Saturday, 5 March 2016
Riley's Block
This block is called Riley's Block and I decided to use the stripe fabric in different ways to see how it would turn out. It turned out rather striking I though. Not to sure what I will be doing with it, maybe the front of a wheelie walker bag.
Tuesday, 20 October 2015
Fat Quarter Bag.........
I am loving this bag made from 5 fat quarters. I don't usually make bags but this one caught my eye.
The 4 fat quarters are cut into 10 1/2 inch by 9 1/2 inch rectangles. They are all joined together and folded in half and you have the bag and the lining in one. On the front half I ironed some iron on pellon. I quilted the rectangles just from corner to corner. With the 5th fat quarter you make the handles and the binding. You then bind the top of the bag and the 2 sides. You fold the bag till you get the shape you like and stitch up where the ends of the bag meet, making sure you leave enough of the top layer to fold down and sew the button on. The bottom of the bag is then sewn accross and about 4 1/2 inches from the bottom corner of the bag, make a triangle and stitch accross to shape the bottom of the bag. Make the handles and stitch on. A very quick and easy project. I think I will keep this one as I usually give away the things I make.
Thursday, 8 October 2015
Folded Work......
Monday, 3 August 2015
Cushions from Mystery Blocks......
It was a very interesting idea and the blocks could be put together in whatever pattern that you liked.
We cut the corner out of the blocks and than stitched them to a different coloured block with a 1/4 inch allowance. We did this 3 times on each block and the corner of each block had 3 different colours on it. Just something a bit different. It was a very enjoyable day seeing all the different ideas that the ladies came up with.
Saturday, 13 June 2015
Table Runner......
The start of a table runner that we did at our patchwork group. Done in the colours that I like. The pattern looks quite complicated but it was really easy. Just the way the blocks are joined. I have ironed pellon on the back and quilted in the ditch and now I need to bind the edges and it will be finished. I need two of these so I will have to make another one
..
..
Sunday, 31 May 2015
Dear Allison Quilt Blocks........
Monday, 18 May 2015
A Fantastic Idea.......
I always nod off when we are travelling and I saw this fantastic idea of the Seatbelt Pillow on the So Sew Easy Blog.
Very simple and easy to make. The pillow attaches to the seatbelt by the velcro straps.. I tried it out on the weekend and after tweaking it a bit to get it how I liked it, I found that it stopped my head from falling forward. It also has a little pocket to hold a phone or ipod. I made mine out of a piece of cotton, the instructions said to use fleece, but you could use whatever you have on hand.
The above photo is showing the pillow attached to the seatbelt.......
.....
Thursday, 7 May 2015
Rooster Panel............
Monday, 20 April 2015
Another Mystery!!!!!!!!
Once again we had a mystery day at our Patchwork Group. We had to bring 16 4x4 inch squares made up of 2 pieces of 8 different fabrics.
It makes it a bit difficult to pick fabric when you don't know what you are making.
I guess that is why it is a mystery.
It makes it a bit difficult to pick fabric when you don't know what you are making.
I guess that is why it is a mystery.
Monday, 6 April 2015
Pretty Placemats.......................
Each year our Patchwork Group exchanges a gift at Christmas. This year we are exchanging placemats. I decided to get in early and make mine. This is an awesome design from Sweet Pea Embroidery Designs, It was actually for a cushion but I thought it would make a wonderful placemat. Now to wrap them and put them away until Christmas.......
Subscribe to:
Posts (Atom)


